Le WallkeX3 et Wallke X3 PRO sont équipés d'un intelligent affichage LCD.
L'affichage LCD situé au milieu du guidon possède de nombreuses fonctionnalités, notamment protection par mot de passe, assistance au démarrage, et beaucoup de retours électroniques pour n'en nommer que quelques-uns. Le tableau de bord dispose de ports USB pour charger d'autres appareils, ce qui peut être une fonctionnalité pratique si vous aimez utiliser votre téléphone pour la musique ou la navigation pendant que vous roulez.
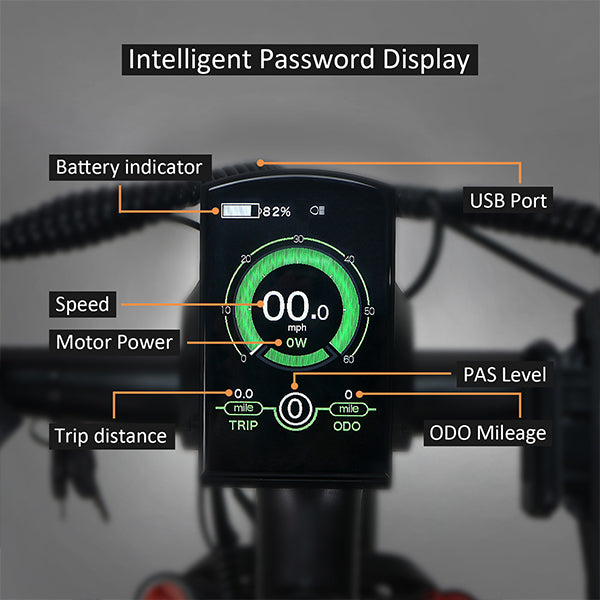
Fonctions :
- Indication de la batterie et du pourcentage de batterie
- Indication de la puissance du moteur
- Indication du niveau d'assistance
- Indication de la vitesse (y compris la vitesse actuelle, la vitesse max et la vitesse moyenne)
- Compteur kilométrique et distance de trajet
- Fonction d'assistance à la poussée
- Indication du temps de trajet
- Éclairage On/Off
- Indication de code d'erreur
- Indication de la fréquence de pédalage (optionnel)
- Indicateur de connexion USB (optionnel)
- Indication de l'autonomie restante (optionnel)
- Paramètres divers (par exemple, taille de roue, limite de vitesse, barre de niveau de batterie, niveau d'assistance, courant limité du contrôleur, activation du mot de passe, etc.)
- Récupérer les paramètres par défaut
Fonctionnement général :
-Activation/Désactivation du système E-bike
Appuyez brièvement sur le bouton d'alimentation pour allumer le système E-bike, et fournir l'alimentation au contrôleur. Pour éteindre le système E-bike, maintenez le bouton d'alimentation enfoncé pendant 2 secondes. Le système E-bike n'utilise plus l'énergie de la batterie. Lors de l'extinction du système E-bike, le courant de fuite est inférieur à 1 uA.
■Lorsque vous garez le E-bike pendant plus de 10 minutes, le système E-bike s'éteint automatiquement.
Vous pouvez en apprendre davantage en cliquant ici.
Paramètres généraux :
-Paramètres de limite de vitesse
La valeur par défaut de Wallke X3PRO est de 28 mph. La limite de vitesse représente les paramètres de vitesse limite. Lorsque la vitesse actuelle est supérieure à la limite de vitesse, le système E-bike s'éteindra automatiquement. La plage de limite de vitesse est de 14 mph à 28 mph.
Pour changer les paramètres de base, appuyez sur le bouton “+” ou le bouton “-” pour augmenter ou diminuer jusqu'à ce que la valeur souhaitée soit affichée. Appuyez sur le bouton “i” pour confirmer, l'affichage "OK" indique que l'opération est terminée. Pour enregistrer un paramètre modifié et quitter les paramètres généraux, maintenez le bouton “i” enfoncé pendant 2 secondes.
Le manuel de l'utilisateur ci-dessous vous montrera comment effectuer le réglage général.


Leave a comment